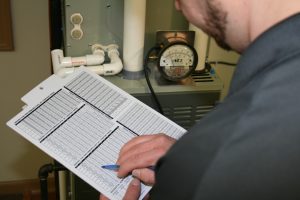
I hear a lot of reasons for taking static pressure measurements on every service call. One of the most common is that it takes too long — there isn’t enough time on a call to do it. Let’s face it, technicians have a lot of responsibilities and measuring static pressure adds to them. What if there was a way to streamline this measurement to take less time? Would you do it then?
Because there are many technicians out there who have been taking static pressure measurements for a long time, we approached some of them to share their tips to speed up the process. Based on their input and experience, here are three tips to help you improve your speed and remove some common barriers.
Number One: Have Everything You Need
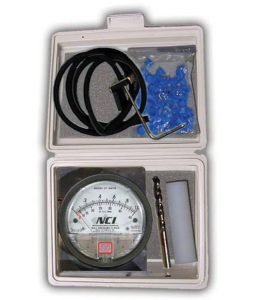
To illustrate, professionals who take static pressure measurements consistently tell us they have everything they need in a single place. This means they all carry common test instruments and accessories needed for each call. These include the following:
- Manometer – analog or digital
- Static pressure tips and tubing – neoprene or silicone
- 3/8” test port plugs
- Small drill / impact gun with a unibit and 3/8” drill bit with a sheath / stop
- Thin screwdriver – for cleaning out internal duct liner.
A complete kit that includes these items can typically be put together for less than $200 dollars. You might be tempted to remove some of these items, but don’t. Why? Because they all have a purpose.

An accurate Manometer is one of the core instruments of a good air diagnostic technician. These gauges are the industry standard to measure fan and blower pressures, filter resistance, pressure drop across systems. Learn more here.
Additional information to make sense of the pressure readings is also a part of every toolkit. This includes:
- Static pressure test diagrams – to help remember test port locations
- Static pressure budgets – to make sense of the pressure readings
- Field reference guides – for those who have been to NCI training classes.
Once again, these items are all kept together, not randomly scattered throughout a service van. This increases your time management. For example, most technicians can find their favorite set of refrigeration gauges blindfolded. These test instruments should be the same– know where they are.
Some technicians carry these items in their everyday service bags, while others keep them in a dedicated hard case or tool bag. This decision is based on personal preference and what works best for you. I kept mine in a ballistic nylon briefcase made by Fieldpiece with the rest of my test instruments. In other words, the key is to have them with you, in one location.
Number Two: Have a Process
To measure static pressure in the most efficient way possible, you need a process that works. Now this may sound cumbersome and rigid, but it’s simply a plan to help account for variables that affect getting your measurements.
To that end, two issues affecting this the most are equipment type and installation location. These two factors determine where and how you install your test ports. Once you know how to account for them, the rest of the process stays the same. Here’s an example:
- Identify the air handling equipment type – gas furnace, air handler, package unit
- Identify test port locations and install the test ports
- Find and record equipment maximum rated total external static pressure (TESP) from the indoor nameplate
- Hook up your manometer, tubing, and static pressure tip
- Turn on the equipment so it operates at the highest blower speed
- Measure and record your four static pressure readings
- Calculate TESP and pressure drops
- Compare measured TESP to equipment maximum rated TESP
- Compare measured pressure drops to static pressure budgets
- Identify restrictive components based on highest pressures.

If you want to be able to measure static pressure without taking too much time, you need a process that works. This may sound cumbersome, but it’s simply a way to help account for variables that affect getting your measurements.
Indeed, the improvement of your skills is in direct proportion to the amount of practice you’re willing to invest in. The first few times you take static pressure measurements, it’s going to take some time because you’re unfamiliar with the concepts. With a little training and repetition, these steps can be performed in less than five minutes.
Number Three: Have a Purpose
The last tip helps to establish what you plan on doing with the static pressure readings. That is to say every successful technician has a purpose for measuring static pressure. For some, it’s to uncover hidden problems that other technicians miss. For others, it’s to diagnose and solve elusive comfort complaints other companies deem unfixable. Whatever your purpose is, be sure to define it and use it to motivate yourself daily.
Don’t Procrastinate. The decision to open the doors available for taking static pressure measurements is up to you. The key is to do it, don’t procrastinate – the time will never be right. To help you out, I’m offering a Static Pressure Quick Start Guide that includes the basic information you’ll need to start measuring. Send me an email to request your copy.
David Richardson serves the HVAC industry as a curriculum developer and trainer at National Comfort Institute, Inc. (NCI). NCI specializes in training focused on improving, measuring, and verifying HVAC and Building Performance.
If you’re an HVAC contractor or technician interested in diagnosing and solving airflow problems, contact David at davidr@ncihvac.com or call him at 800-633-7058. NCI’s website — www.nationalcomfortinstitute.com — is full of free technical articles and downloads to help you improve your professionalism and strengthen your company.

