Flex ducts could be in imminent danger. A few months ago, I wrote about a recent proposal to severely limit the use of flexible (flex) ducts. Due to poor installation methods, the International Association of Plumbing and Mechanical Officials (IAPMO) is proposing to limit use of flexible duct to only five feet in length. How can we move past this proposed change and learn from it?
To correct common problems associated with poorly performing systems using flex duct material pay attention to detail. Let’s expand on how to improve typical flex duct installation defects to assure your systems perform as intended.
Step One: Avoid Sharp Turns When Installing Flex Ducts
To increase the performance of your installations, avoid sharp turns at all cost. Your systems work best by routing ducts as straight as possible. Due to many of the obstacles found in homes today, this isn’t always an option.

Trollstigen – famous road in the Norwegian mountains have sharp turns that are fun to drive on. In flex ducts, such sharp turns are not good.
When you make a turn, do your best to keep it to a minimum. Long sweeping turns work best and allows an easier path for air to travel. Sharp, 90-degree turns kink flex ducts internally and reduce airflow. In restricted duct, static pressure in the system rises decreasing system performance.
Some common places these restrictions occur are where flex ducts are incorrectly fastened to takeoffs and boots. Once the connection is made, there is often an immediate turn that destroys airflow. Solve this by providing plenty of support for the duct where it changes direction or use a sheet metal elbow.
Structural framing is another common obstacle encountered in many attics. To get around them, ducts may need to be rerouted or a different location used to avoid sharp turns.
Step Two: Increase Support When Installing Flex Ducts
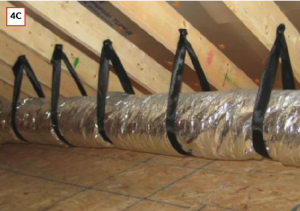
Sags and kinks due to inadequate support are a common cause of poor airflow and comfort complaints. Many contractors only support flex ducts every five to six feet, which results in severe drooping. This condition will worsen over the life of the duct system and continue reducing airflow.
Kinks in the ducts require additional support. When you use thin materials such as plumbing strap or wire for hanging, the duct becomes choked at this point. In severe situations, wire can cut into the duct causing severe air leakage into unconditioned areas of the building.
When these defects exist, air gets choked off and slows down. To correct these problems, provide support at more frequent intervals such as every three feet instead of five feet.
When installing more support, make wise choices in the materials you use to prevent kinks. At a minimum, use three-inch wide hanging straps or metal bands to cradle the duct. When you use these two methods, you make your installed flex ducts resemble insulated sheet metal.
Step Three: Remove the Excess Core in Flex Ducts
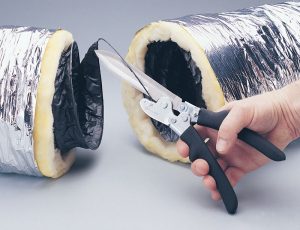
Another common defect resulting in low airflow occurs when the inner core bunches up when fastened to a boot or takeoff. This happens if you don’t pull the core tight and cut it to length. Once you pull the insulation over exposed metal, you increase the problem as the core compresses.

Avoid bunching up the duct core by stretching out flex ducts as much as possible and by only using the lengths you need.
We’ve removed up to three additional feet of core during many of our duct renovations that would have been missed with a visual inspection. As a result we’ve measured airflow increases of 30 to 40 cfm on a 6-inch duct by removing excess core.
Correct this by stretching flex ducts out as tight as possible. Just because there’s more than 20 feet of flex in a box doesn’t mean to use all of it on one branch run. Once connected to the boot or takeoff, stretch flex ducts tight again and remove any excess core. Complete the connection by attaching the other end and finishing the install.
Step Four: Size the Flex Ducts Right
You can follow the three previous steps to the letter and still doom a duct system to poor performance if you size them according to old school rules of thumb. When you size flexible ducts with methods intended for sheet metal duct, the result is low airflow and high static pressure. These materials are two completely different surfaces. Sheet metal is a smooth surface while flex is an uneven helix core.
Your systems will perform much better if you size your flexible ducts larger. Many like to use the .10 friction rate on a duct calculator for sizing, and assume a six-inch duct delivers 100 cfm. Don’t assume this.
If you must use a metal duct calculator and rule of thumb, size your flex ducts at the .05 friction rate and follow the steps above. This gives you a greater chance of success and systems that perform closer to intentions.
The rubber truly meets the road when you measure the airflow delivery of your systems. You can argue design methods all day long but until you take measurements, it’s strictly a guess.
I encourage you to cover these four steps with your installers and allow them the flexibility to do the job right the first time. Your customers will thank you.
David Richardson serves the HVAC industry as a curriculum developer and trainer at National Comfort Institute, Inc. (NCI). NCI specializes in training focused on improving, measuring, and verifying HVAC and Building Performance.
If you’re an HVAC contractor or technician interested in learning more about duct repairs, contact David at davidr@ncihvac.com or call him at 800-633-7058. NCI’s website www.nationalcomfortinstitute.com is full of free technical articles and downloads to help you improve your professionalism and strengthen your company.


